


Beginner’s Guide to Setting Up a Pilates Studio Schedule
Aug 10, 2025

Starting your Pilates studio means more than finding the right space and equipment—it’s about making it easy for clients to discover, book, and pay for your classes.
A clear, easy-to-use online schedule doesn’t just help you stay organized—it also builds trust with clients, keeps attendance high, and saves you hours of admin each week.
Here’s a step-by-step beginner’s guide to creating a Pilates studio schedule online that works from day one.
1. Map Out Your Weekly Class Structure First
Before you touch any booking software, decide how your timetable will look. This planning step ensures your online schedule is consistent and easy for clients to follow.
Think about:
- Class types: Will you offer mat Pilates, reformer sessions, 1:1 training, or a mix?
- Frequency: How many classes per week for each type?
- Capacity: What’s the max number of clients per class? (Small groups often create a premium feel.)
- Duration: Most Pilates classes run 45–60 minutes—keep it consistent for easier scheduling.
Tip: Group similar class types together in your week so clients can easily remember patterns, like “Reformer every Monday, Wednesday, Friday at 6 PM.”
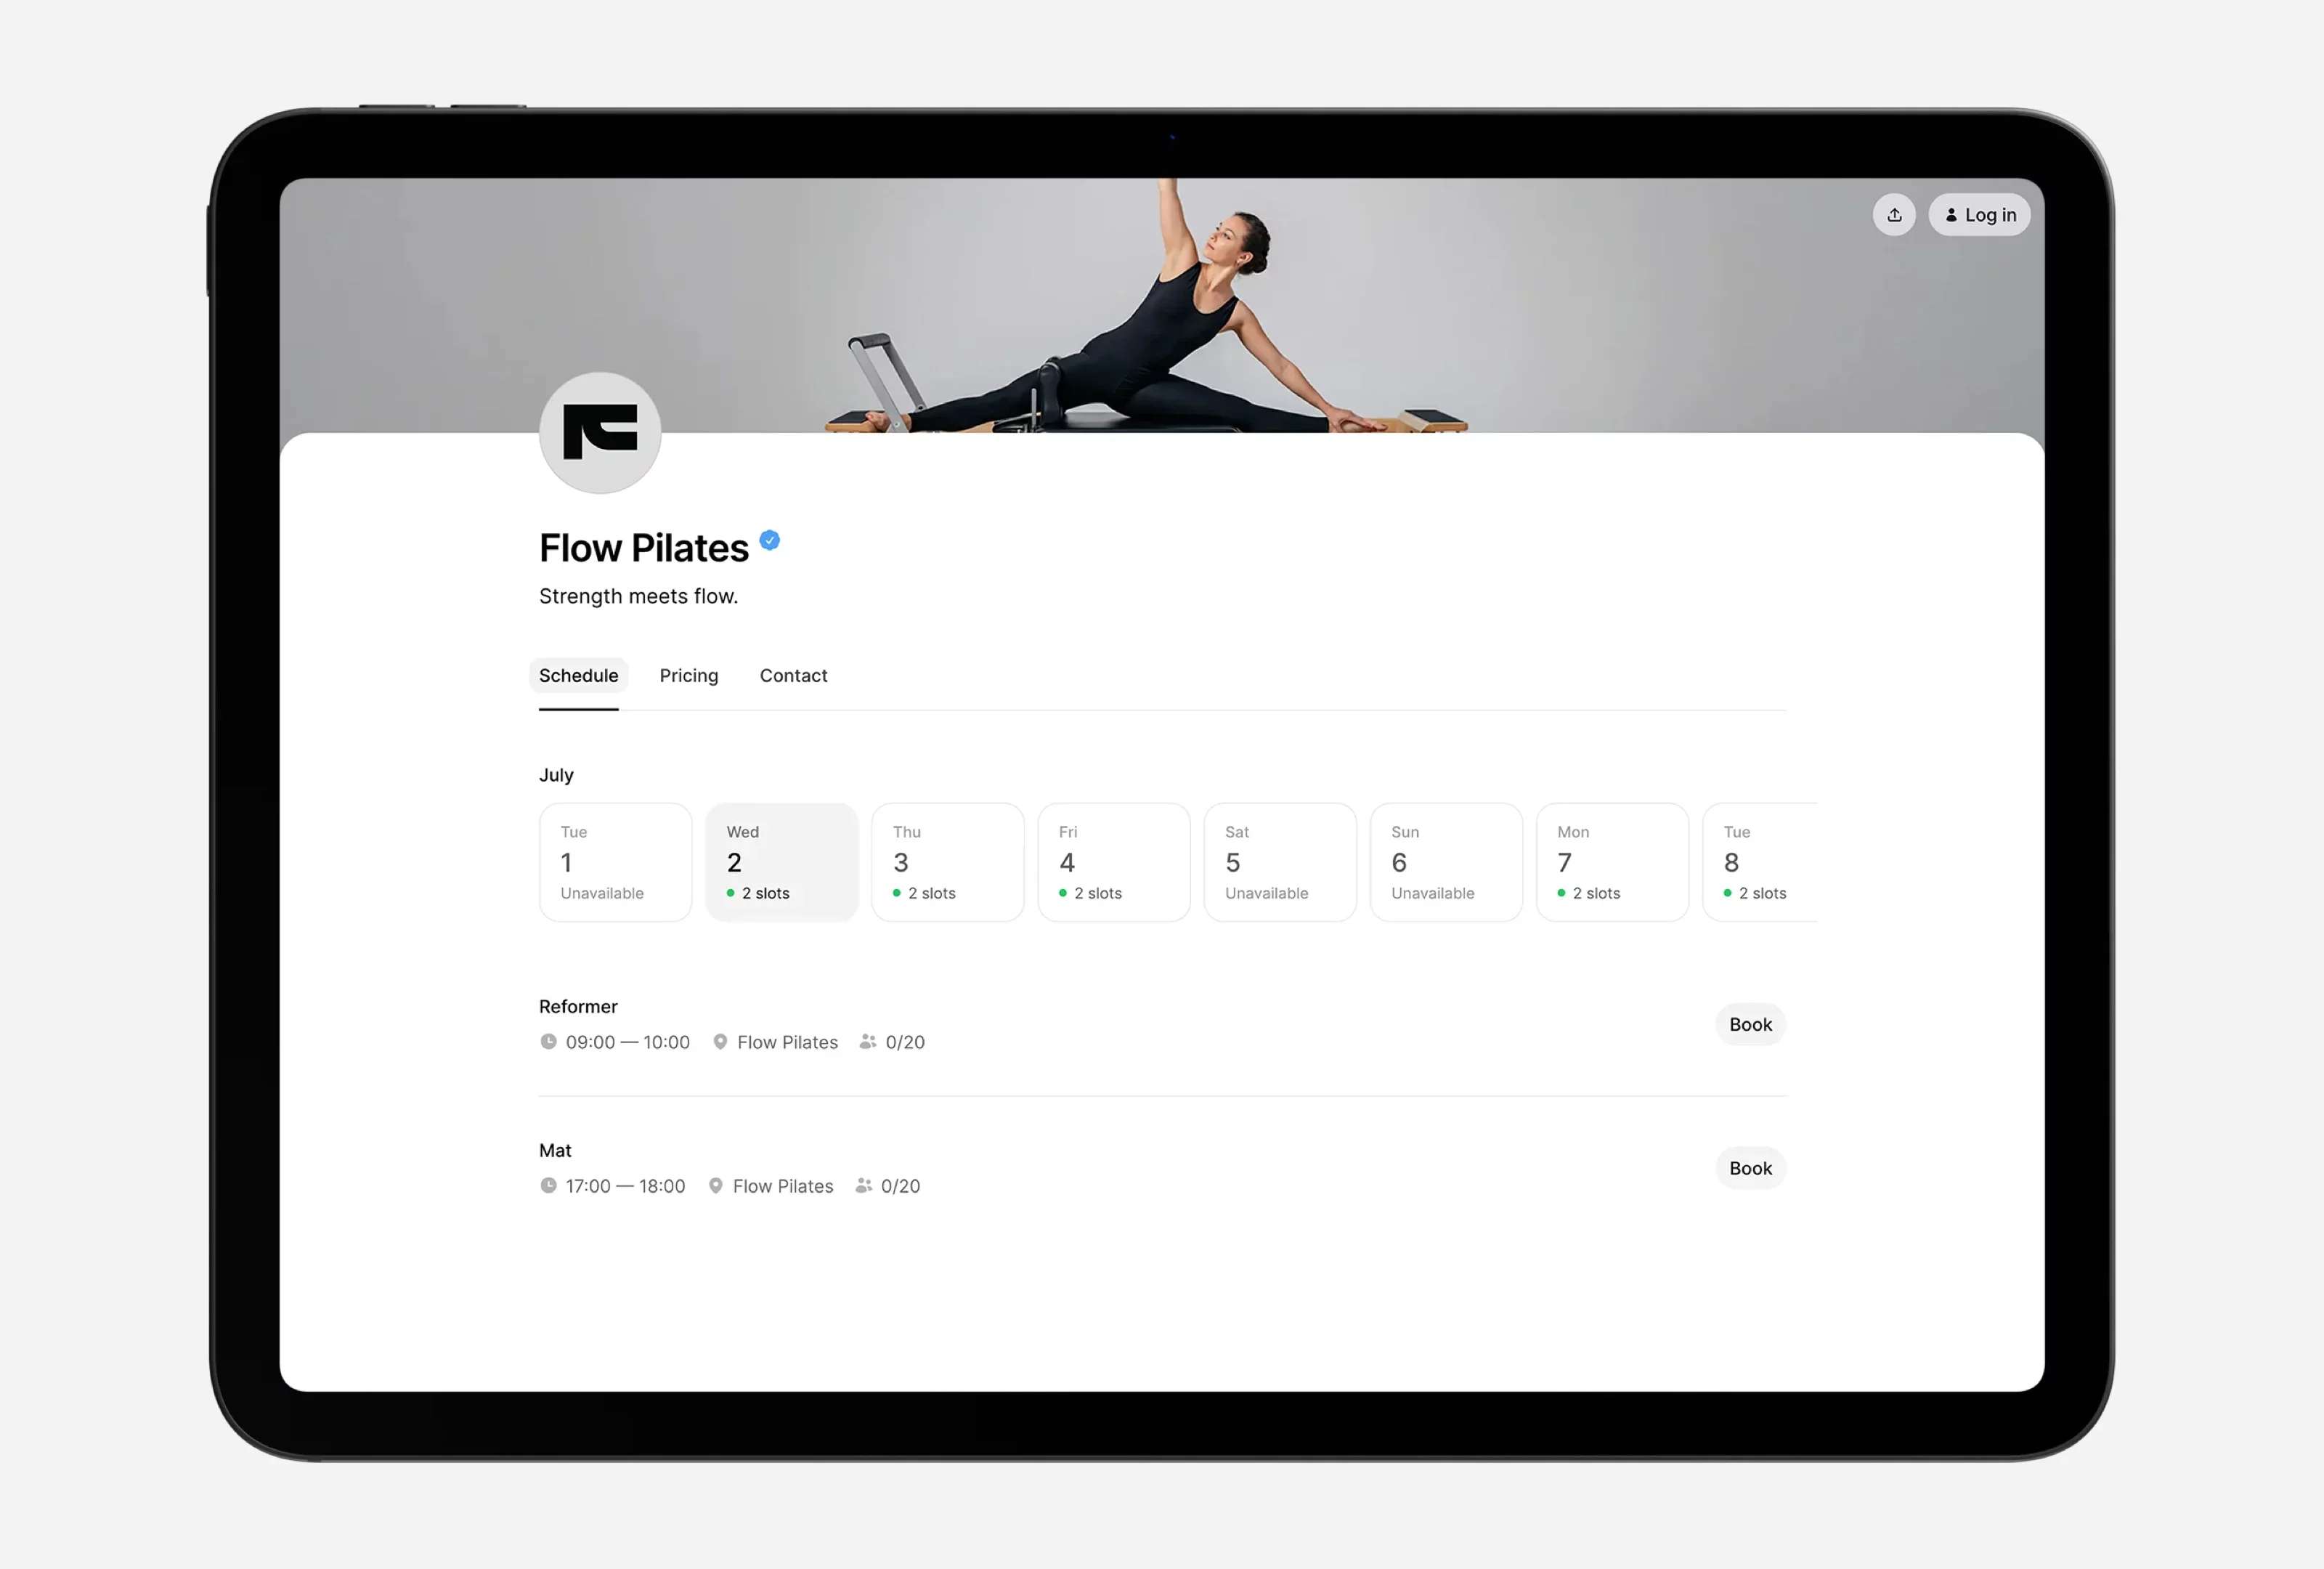
2. Create a Public Booking Profile
Instead of dealing with complicated website plugins, start with a simple public profile link that shows your live class schedule.
With Time2Book, you can set this up in minutes:
- Add your studio name, logo, cover and a short description of your approach.
- Set your cancellation and refund policies so clients always know the rules.
- Add services with class type, duration, and capacity.
Once live, your profile link can go anywhere:
- Instagram bio
- Facebook business page
- Email signature
- Digital flyers or QR codes on posters in your community
This single link becomes your always-up-to-date booking hub.
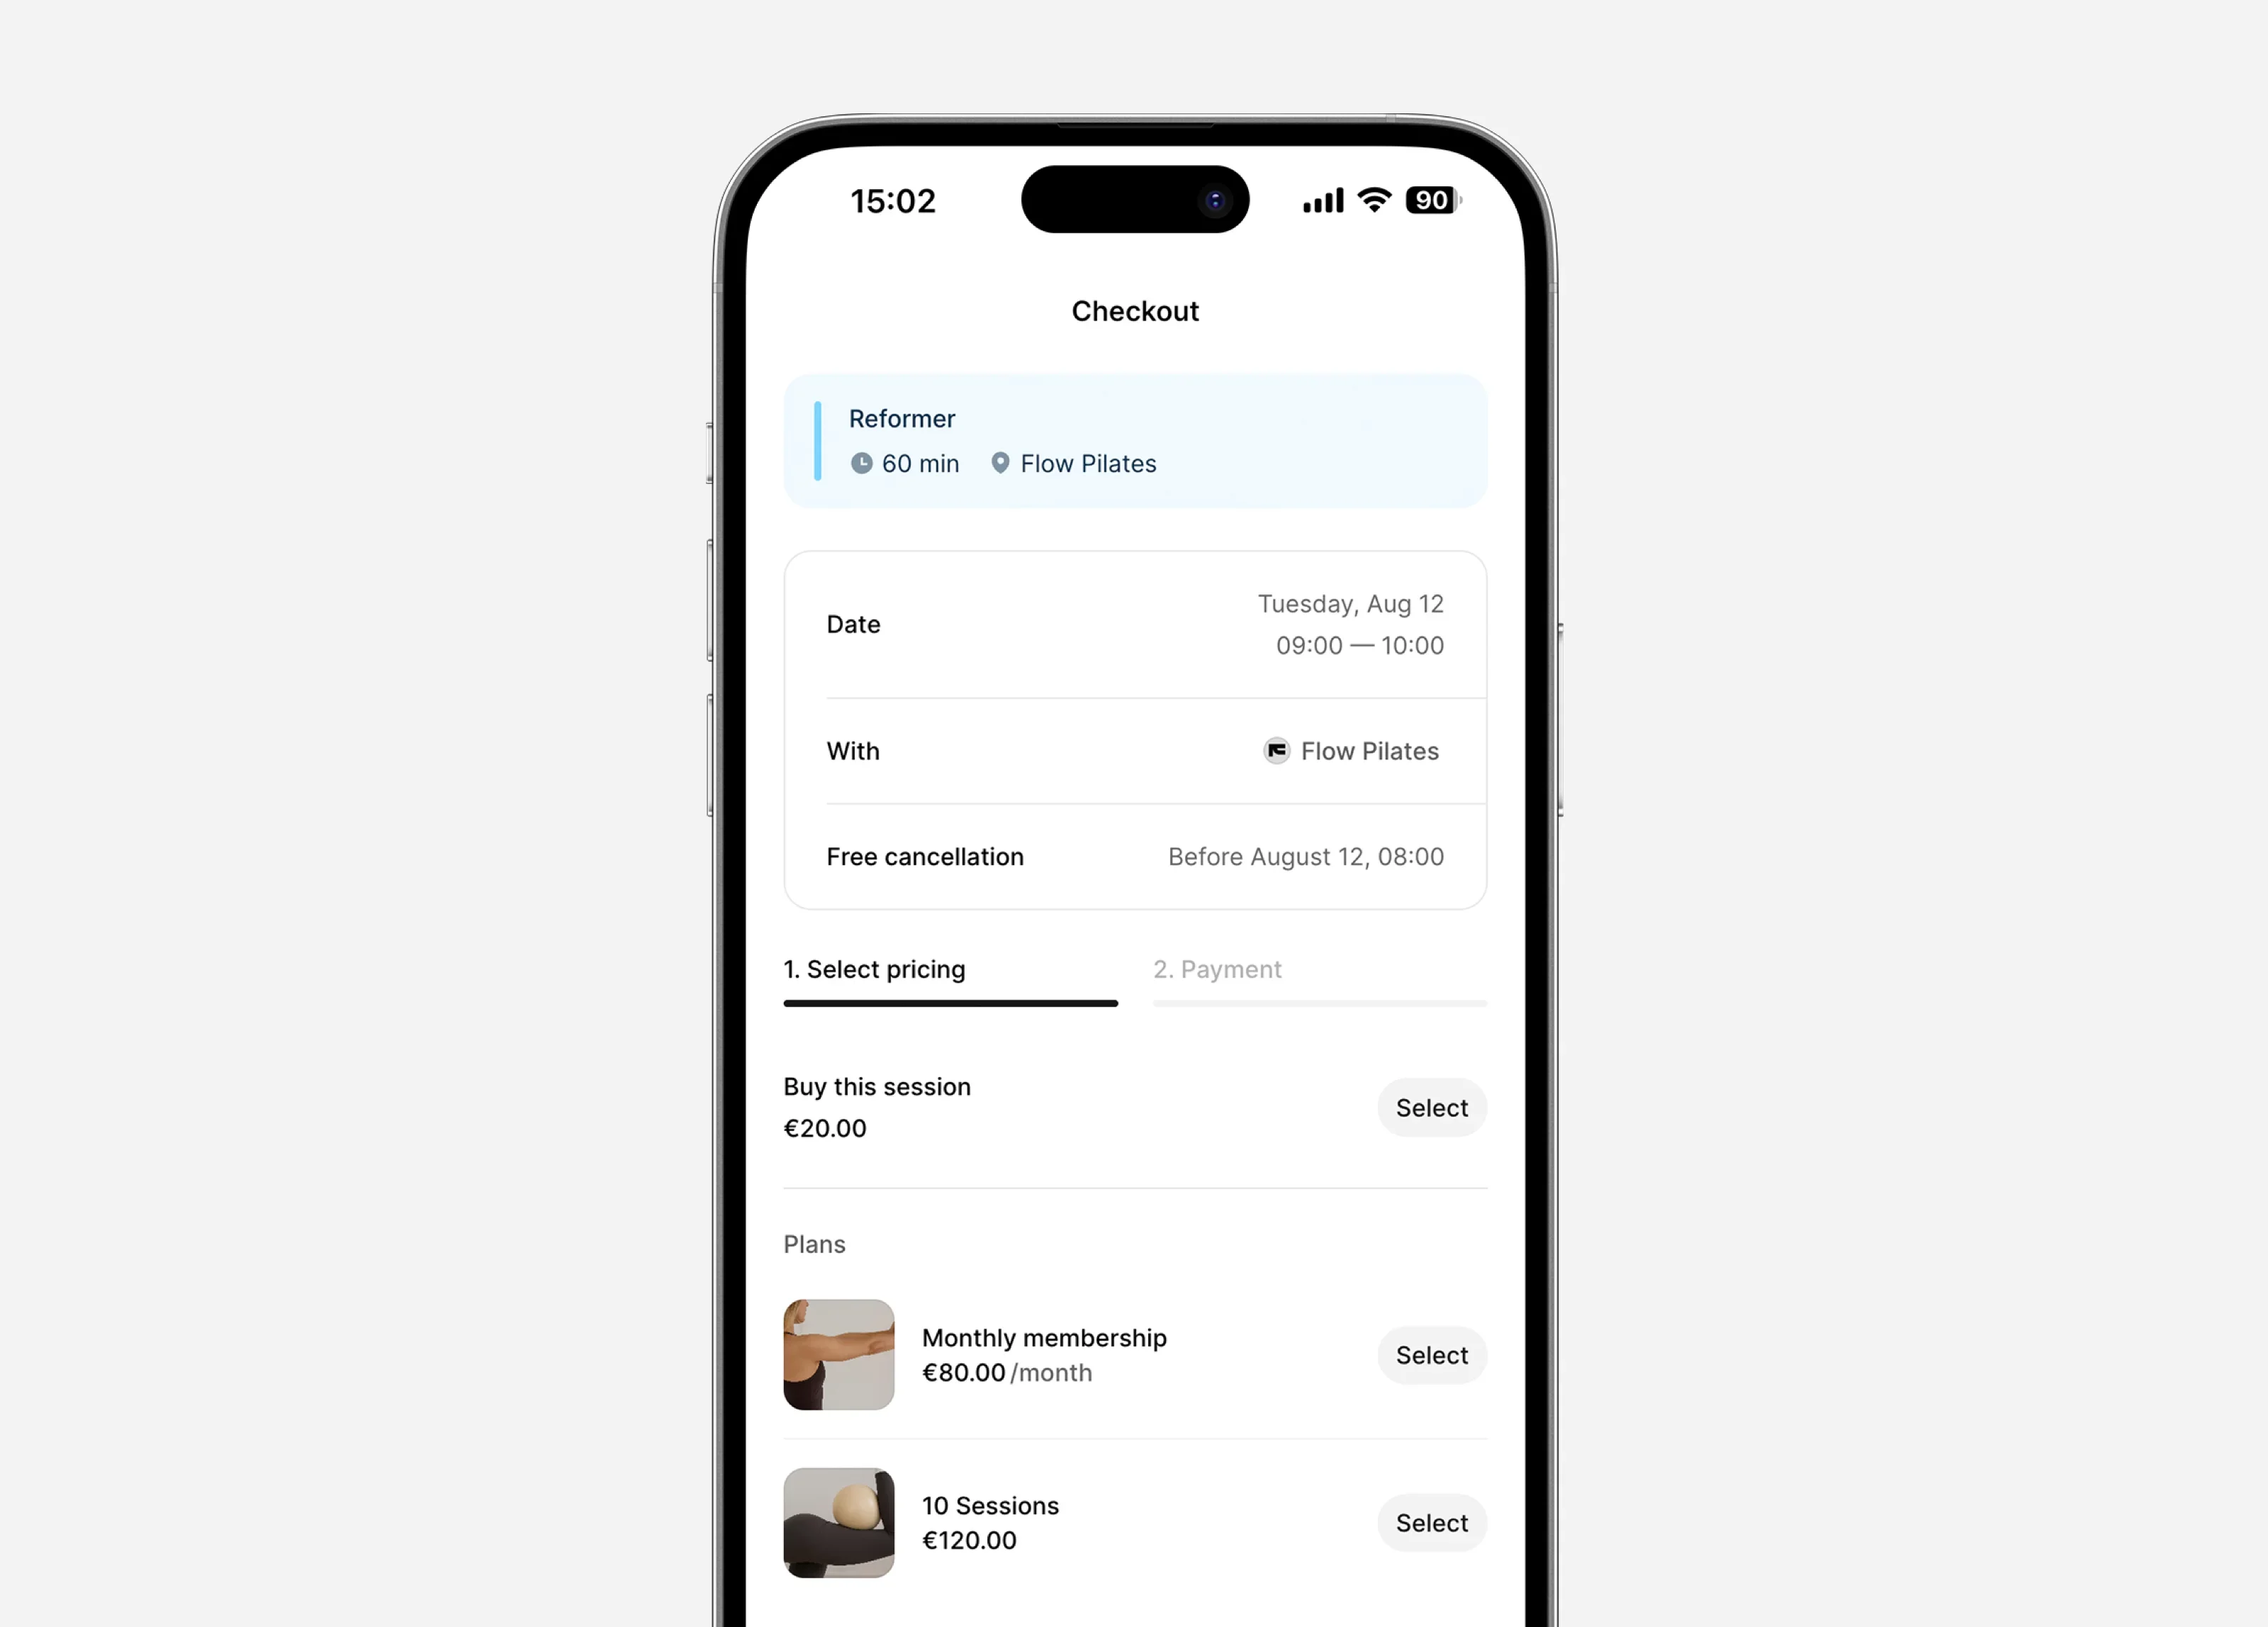
3. Offer Flexible Booking Options
Not every client books the same way. Some commit to monthly memberships, others like buying packs of sessions, and some only drop in occasionally.
In your schedule setup, make sure to:
- Add memberships for regulars who come several times a week.
- Create class packs with a clear validity period (e.g., “10 sessions, valid for 3 months from purchase”).
- Allow single-class bookings so new clients can try you out before committing.
Flexibility = more clients booking in the way that works best for them.
4. Show Live Availability
One of the biggest frustrations for clients is messaging a studio and waiting hours to hear if there’s space.
Your schedule should:
- Update instantly when someone books or cancels.
- Close classes automatically once full.
- Allow clients to secure a spot in real time without back-and-forth communication.
5. Take Payments Upfront
Collecting payments at the time of booking protects your revenue and reduces no-shows.
On Time2Book, this is built in:
- Connect your Stripe account in minutes.
- Accept major credit/debit cards, Apple Pay, and Google Pay.
- See payments appear instantly in your dashboard.
No chasing late payments. No reconciling bank transfers. Everything is tracked for you.
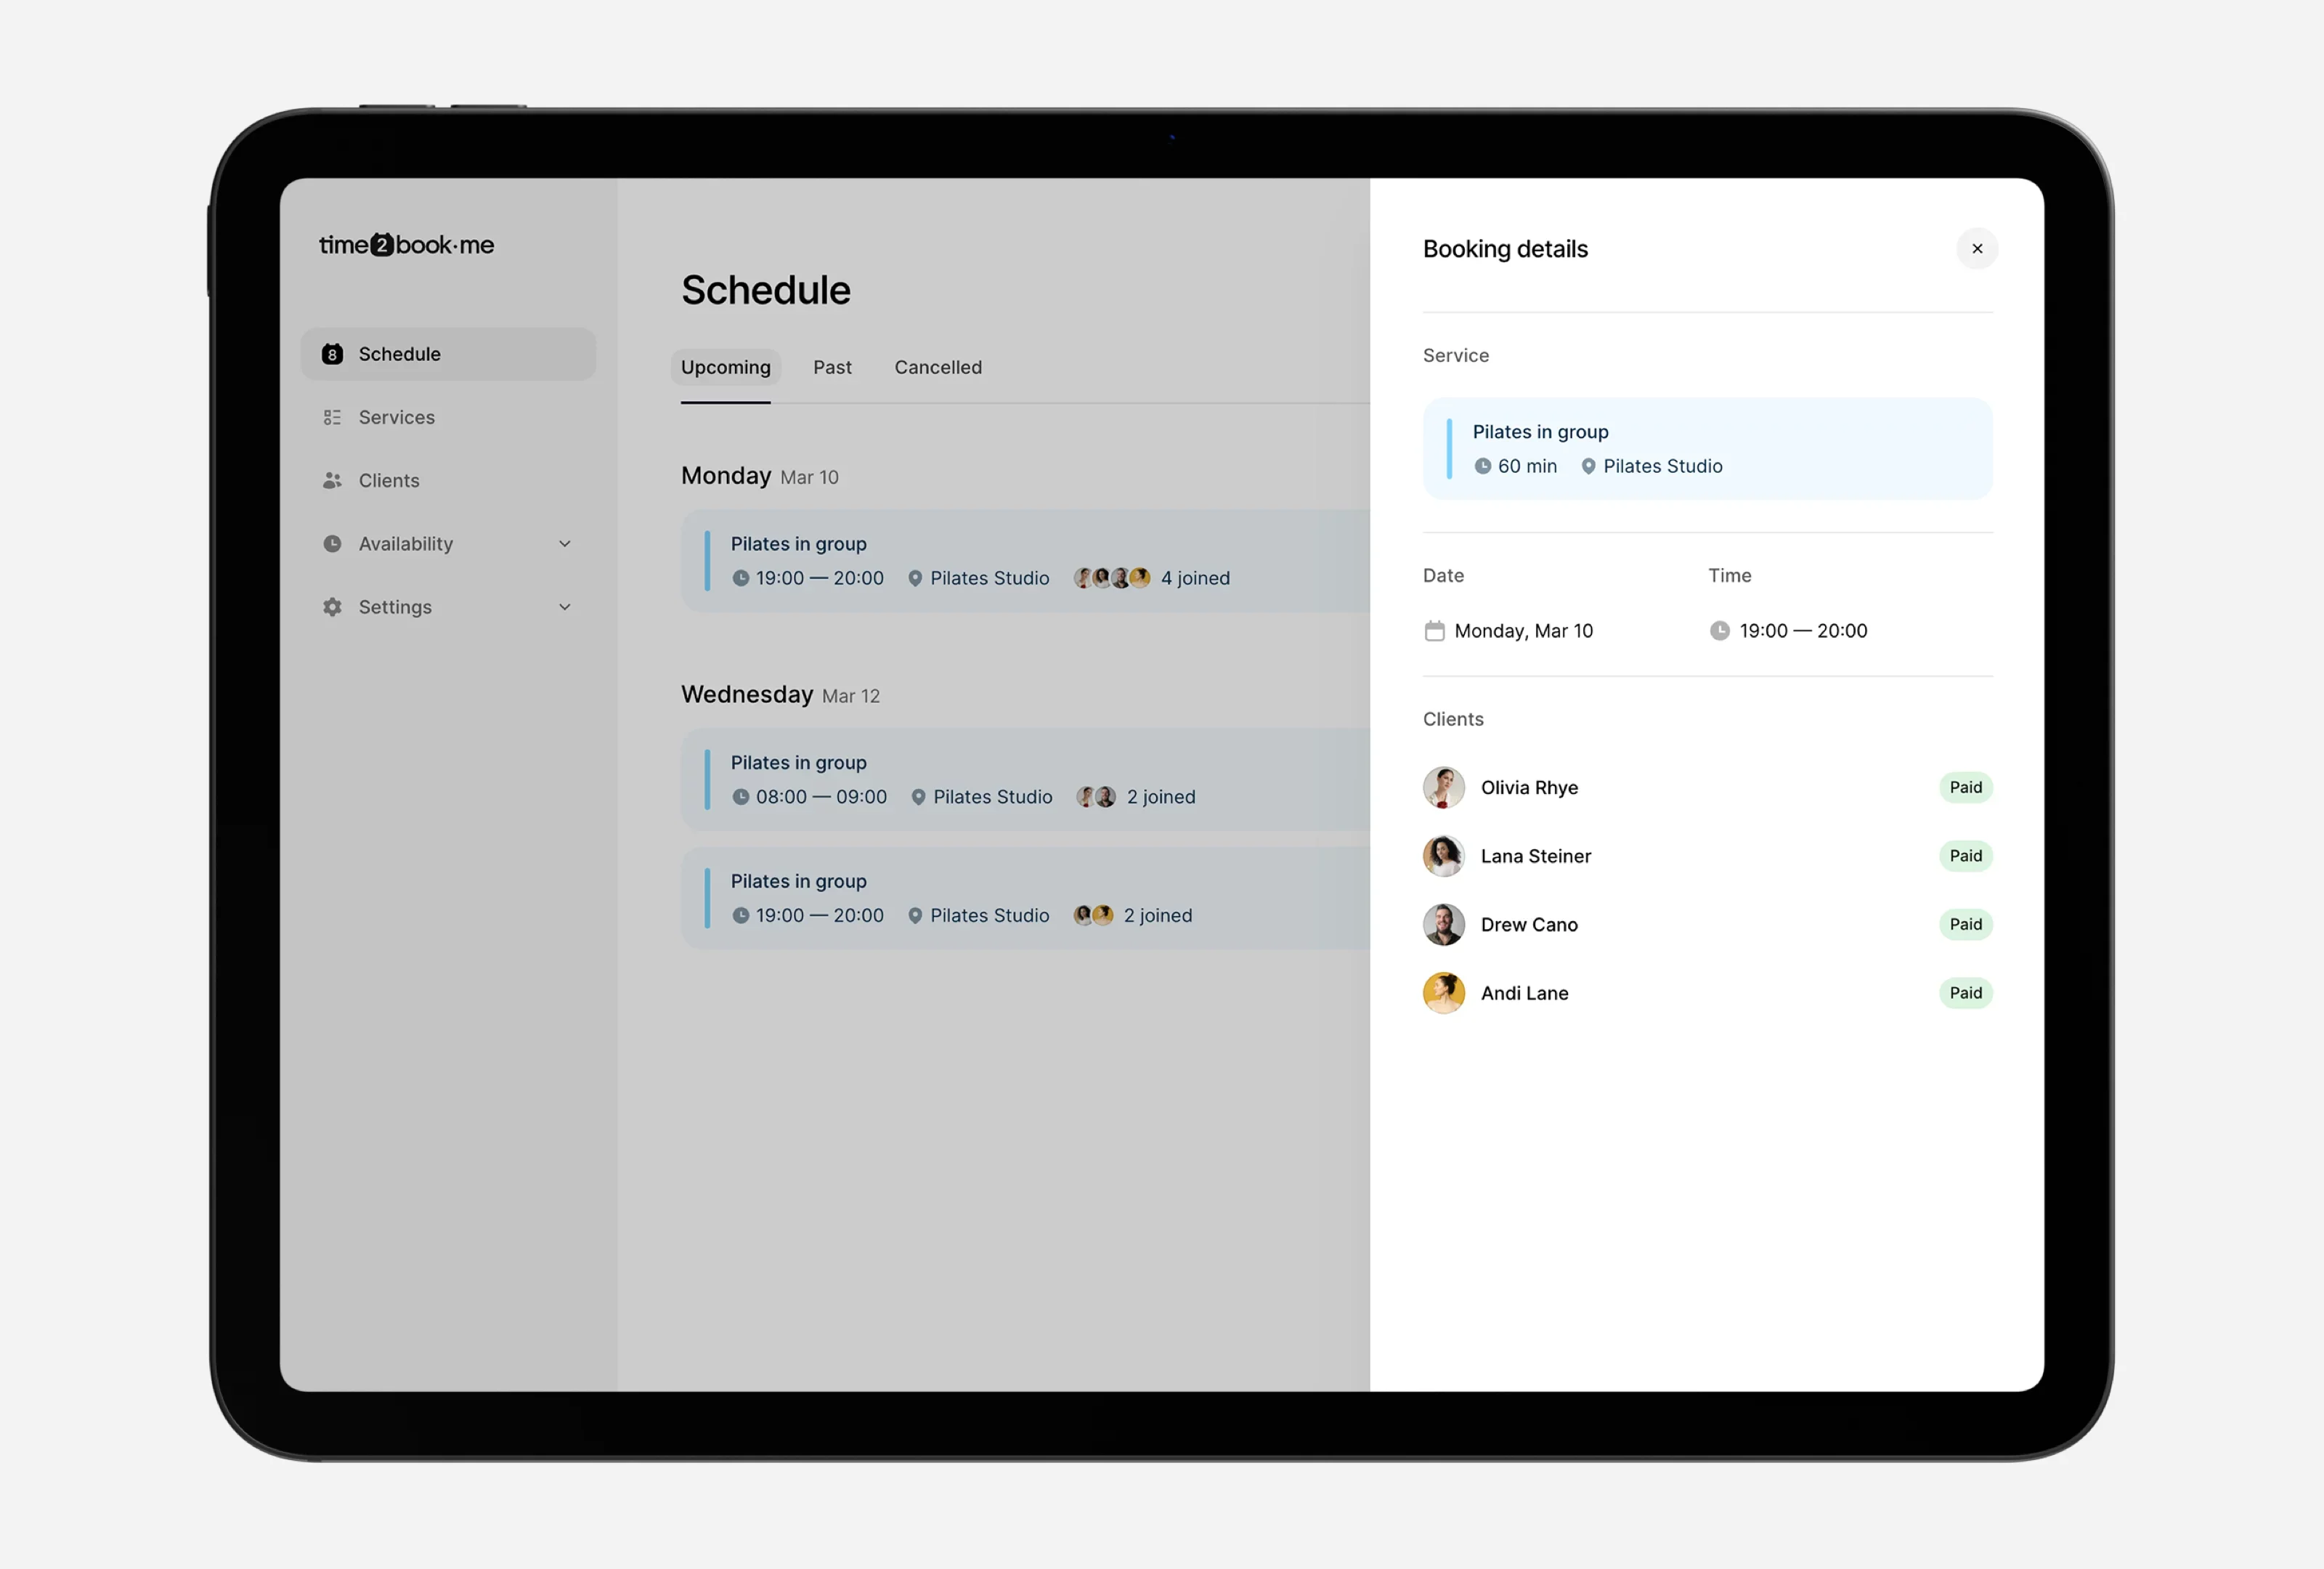
6. Track Attendance and Cancellations
Once your schedule is live, keeping track of attendance helps you optimize your classes.
With the right system, you can:
- See who’s booked for each class in real time.
- View each client’s entire visit history in one place.
Over time, this data shows you your most popular time slots and which classes may need adjusting.
7. Keep It Mobile-Friendly
Most clients will discover, book, and pay for classes on their phone. Your online schedule must:
- Load quickly on mobile devices.
- Be easy to navigate with clear “Book Now” buttons.
- Offer one-tap rebooking for returning clients.
If clients have to pinch, zoom, or scroll endlessly—they’ll leave without booking.
8. Share Your Schedule Everywhere
Visibility drives bookings. Make sure your live schedule link is easy to find:
- Share it regularly in social media posts and stories.
- Include it in every newsletter or announcement email.
- Print a QR code linking to your schedule on studio posters, business cards, and brochures.
- Ask local wellness businesses to display your flyer with the link.
9. Update Your Schedule Regularly
An outdated schedule frustrates clients and costs you bookings. Get into the habit of updating it as soon as you make a change:
- Cancelled classes should disappear from your profile immediately.
- Added classes should be visible instantly so clients can book right away.
This keeps your studio looking professional and dependable.
10. Review & Adjust Monthly
Your schedule should evolve with your studio:
- Identify time slots that are always full—can you add more?
- See which classes need more marketing or an incentive to fill.
- Adjust class types and times based on client feedback and attendance data.
The more you refine your schedule, the better it will serve both you and your clients.
Final Tip: Keep It Simple
Your schedule is the heartbeat of your studio. Keep it clean, mobile-friendly, and easy for clients to book.
With Time2Book, you can have your Pilates studio’s schedule live, bookable, and paid for in under an hour—no coding, no plugins, no stress.
Pilates studio software
Learn more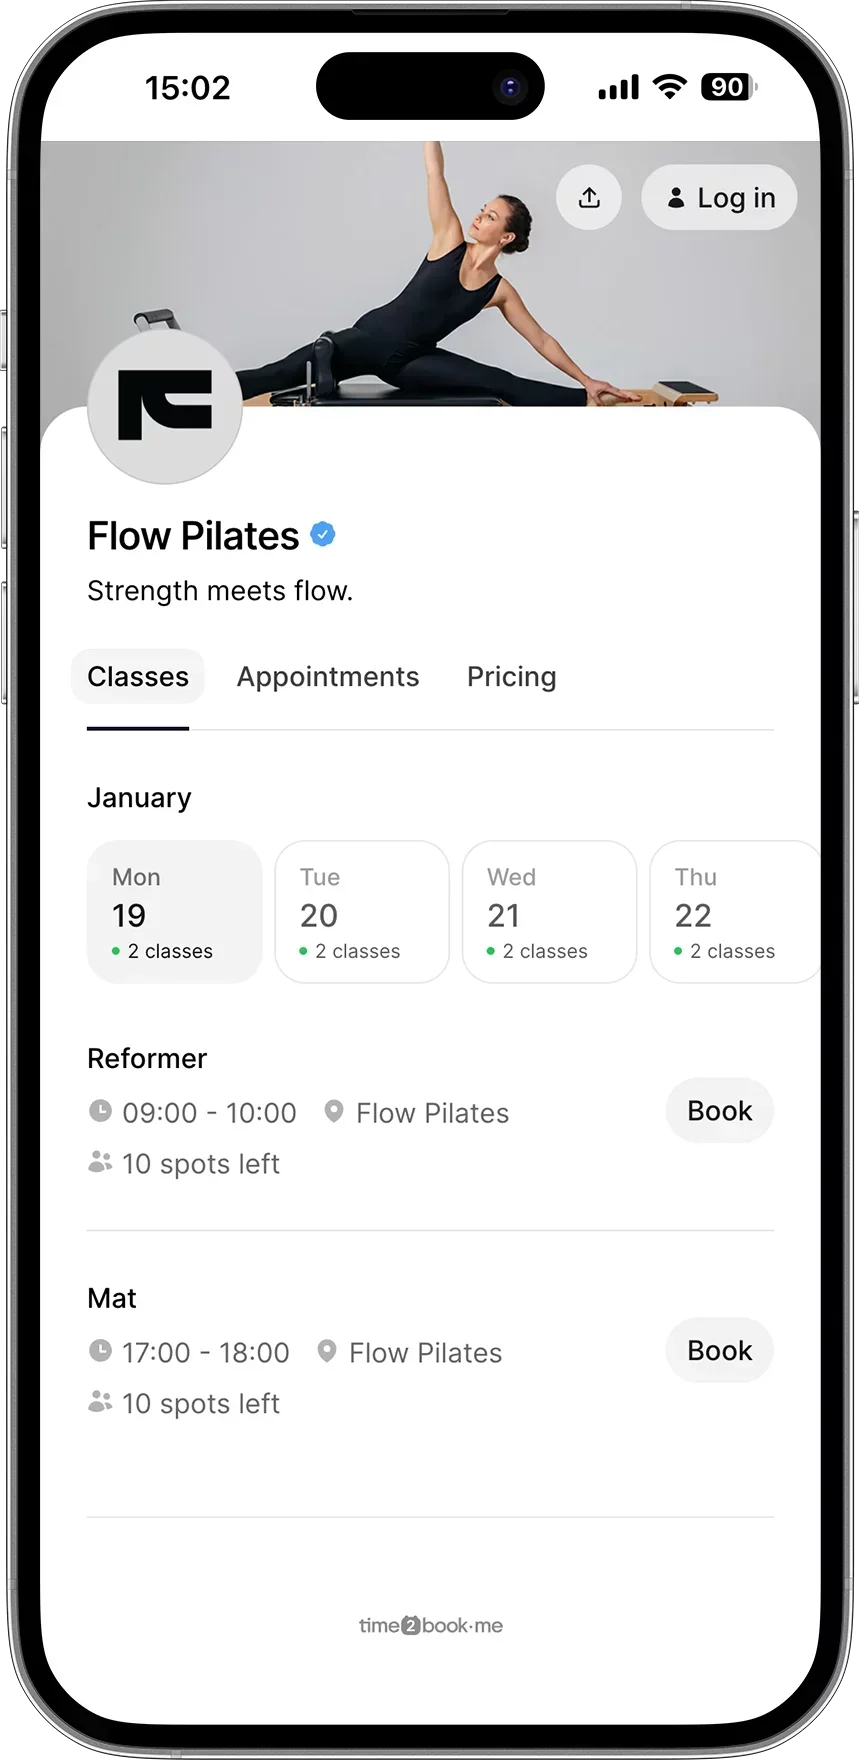
Manage bookings and payments easier
Get a free 7-day trial
No credit card required